| Criteria | Score |
|---|---|
| Aesthetics and visual appeal | 9/10 |
| Suitability and usefulness | 9/10 |
| Sustainability and recycling | 4/10 |
| Problem solving and brief | 10/10 |
| Overall | 8/10 |
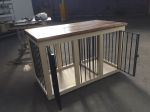
A recent flood meant that the kitchen in my parent’s home had to be renovated. Once this was completed, my stepmother proceeded to home her four small dogs in the cages she already had. Whatever the readers view is on caging dogs, this was her home and lifestyle, and the dogs enjoy the security of their cages at night. The three brothers (Charlie, George and Gizmo, Bichon Frise crossed with King Charles Cavalier Spaniel) have always slept together, while the Pug (Michael) slept alone in a cage next to the brothers. The brief was to design and make a suitable home for these animals to sleep in which was aesthetically pleasing, in keeping with a kitchen environment and was safe for the dogs to use.
The space to locate the cage was limited in dimensions, and already decided. The dimensions were taken and a plan was drawn up to divide the overall width by three, allowing two thirds for the brothers and one third for the Pug. This was an increase in space to the existing cage set up, and the wood was cut to the required dimensions.
It was important that the new cage was aesthetically better than the existing solution, so a measurement was take of each dog’s head, and a bar width gap was calculated from these measurements. The bars were to be 80mm on centre wide, and some calculations were made to work out the optimum spacing for these. I wanted the new cage to look ‘planned’ so some time was taken to ensure that the spacing of the bars was the same on the depth as it was across the width. A 30mm inset was devised (accounting for the width of the wooden upright structural joints) and these were drawn up in Illustrator to create a laser cut jig to ensure drilling accuracy.
Mortice and tenon joints were formed in the wooden frame, and these were glued and clamped. The vertical uprights would be screwed in place at the top and bottom, as these would not be seen once the frame was complete and the worktop was put in place. All wood used was 75mm x 50mm timber used for partition framing, as this is a cheap solution which is pre dried, it is straight and requires a minimum of preparation for finishing. Holes were drilled to accommodate 13mm steel bars, and the top frame had a deeper hole so that the bars could be fitted after assembly of the frame. Gravity would ensure that these bars would stay in place once the cage was assembled.
The bars were cut from 13mm steel tube and were zinc galvanised and sprayed in a satin black paint. This was a chore, given that there were 54 bars plus two door frames to produce, so a hanging spray jig was created to accommodate these pieces. The door frames were created and welded up, the hinge system relying on an oversized bar to facilitate movement.
The top of the cage was made from more 75mm x 50mm timber which was glued and clamped . Once the glue had gone off, the top was sanded and a routed edge was cut around the top. This was then waxed using Briwax and polished to a high gloss sheen.
The cage was assembled and delivered to the client. Unfortunately, the door width was greater than the frame size, so this was disassembled and re-assembled in situ. The client is very happy with the final piece and so are Charlie, George, Gizmo and Michael.